SHOUTcast is a free-of-charge internet DJ solution. It allows anybody on the internet to broadcast audio from their PC to listeners across the globe. SHOUTcast relies on MP3 or AAC technology to deliver audio in a live situation.
Step 1.
*Download & install the latest version of WINAMP: Download Link
*Download SHOUTcast DSP 2.3.3 for WINAMP: Download Link
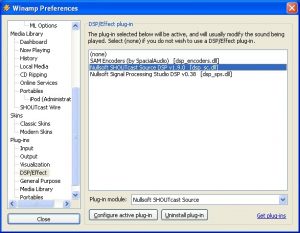 Verify that Winamp is not running, then double click on the installer that you downloaded and follow the on-screen instructions. When the installation process has completed, start Winamp and open your preferences. Click on “DSP/Effects” in the menu to the left, and highlight “Nullsoft SHOUTcast Source DSP v2.2.1 [dsp_sc.dll]”. When you have selected it, a new window should pop up. You may now close your preferences window.
If you see “Nullsoft SHOUTcast Source DSP v1.9.0” in the right pane, then you have correctly installed the SHOUTcast Broadcast DSP Plug-in.
SHOUTcast Source DSP
Step 2
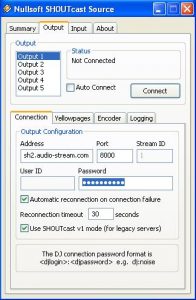
Select the “Output” tab at the top of your DSP window. Select “Output 1” under the selection box, and fill in all of the following fields properly.
Address:
Here, you need to enter the server that was given to you in the welcome email you received from AZ-StreamingServer. It should look something like “az-streamingserver.com”. Make sure that you put in the proper server, or else you will not be able to connect.
Port:
In this field, you need to enter the port that was given to you in your welcome email. It should contain 4 numbers. Once again, this must be set properly or else you will be unable to connect.
Password:
Last, but not least, you need to set the password that was given to you in your welcome email, or the one that you changed it to. Enter this here, and make sure there are no mistakes.
Step 3
Yellowpage setup (streaming server display details)
Click on the “Yellowpages” tab right above where you entered all of the previous information.
If you’d like your server to be listed in the SHOUTcast directory, check the “Make this server public” box, and fill in all of the information below the box in a proper manner.
Be sure to check the “Enable Title Updates” and the two boxes that say “Auto” in
order to show your users the title of the song that is playing.
Step 4
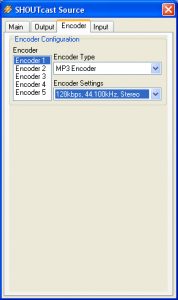
Encoder Settings (select streaming audio format)
Select the “Encoder” tab at the top of your DSP window.
Make sure under the selection box, you have selected “Encoder 1”.
The Encoder Type can be set to either MP3 or AAC+, our servers support both.
MP3 audio sounds alright, but is compatible with just about every media player on the market. AAC+ is only compatible with Winamp and Windows Media Player (with a plugin), but sounds much better at lower qualities. Be sure to choose wisely.
In the Encoder Settings dropdown, select the bitrate that you ordered from us, and be sure that the line you selected has “Stereo” at the end, so individual sounds will come out of both of your listeners speakers.
Note: If you stream at a bitrate higher than what you have ordered, we will send you a warning email, and your account may be deactivated.
Step 5
Input settings (select the input audio surce)
Select the “Input” tab at the top of your DSP window. Unless you have specific soundcard input settings, or want to talk on your stream, select “Winamp” at the Input Device. As every soundcard is different and individual, we cannot give any tutorials for the Soundcard Input.
Step 6
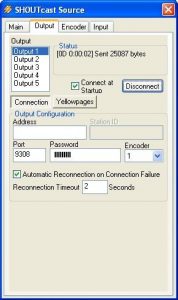
Go back to the “Output” tab in your DSP window. Make sure “Output 1” is selected, and then click the connect button. In the status box above the button, it should give a time and then “Sent xxxx bytes”.
Congratulations, you have begun to stream audio!
You may now open any Winamp-compatible audio file in your player, and it will stream to our servers.
How to Broadcast Live with ShoutCastDirect Hosting using turntables?
To broadcast with ShoutCastDirect the live content from the turntable you will need to install the software that would allow you to connect your turntable to the PC. Most new turntables have USB or FireWire audio output build-in so they can be easily connected to the PC. The PC should have the hardware drivers installed for the turntable and recognize it as a valid audio input device.
The turntables that do not have the USB or Fire wire audio output connections can be attached to the PC with the Long male to male 1/8″ Stereo – 1/8″ Stereo cable
Here are the cables that can be used to connect the turntable to the PC:
Step 1.
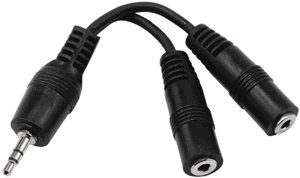
Obtain Dual Short 1/8″ Stereo – 1/8″ Stereo cable with two female endings (also known as Dual Headphone Jack splitter).
One plug will be used for headphones (we are assuming that the headphones have a classical 1/8″ stereo-out male connector) and the other for the line-in on the PC audio card.
In some cases the 1/8″ Stereo – 1/8″ Stereo cable may not be needed if the turntable has several headphone jacks. If the headphone jacks are not 1/8″ Stereo the 1/4″ adapters may be needed. Also the turn table could have RCA out, in that case 1/8″ Stereo Plug to RCA can be used to plug the turn table directly in to the soundcard Line-in.

In case the turntable has only the 1/4″ stereo-out you will need the 1/8″ to 1/4″ stereo adapted. Plug the adapter in to the stereo-out of the turntable and then the Dual Short 1/8″ Stereo – 1/8″ Stereo cable in to it.

Step 2.
The last cable you will need will be the long male to male 1/8″ Stereo – 1/8″ Stereo cable.
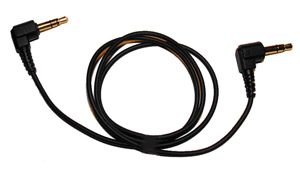
Plug the earphones in to one end of the Dual Short 1/8″ Stereo – 1/8″ Stereo cable and then the long male to male 1/8″ Stereo – 1/8″ Stereo cable in to the other end. The long mail end of the 1/8″ Stereo – 1/8″ Stereo cable should go in the blue soundcard line-in jack. WARNING: before you connect the cable to the soundcard make sure the volume is at minimum.
How to configure Winamp DSP to broadcast live content from the turntable in to the ShoutCastDirect streaming Station.
Step 1.
In the Encoder menu on the Winamp ShoutCastDirect Source applet, please set the encoder bit rate to what ever bit rate you ordered from ShoutCastDirect ShoutCastDirect ShoutCast Hosting (ie. 24kbps to 128kbps). This is the bit rate up to which you are allowed to stream.
Select the Input menu and set the Input device as Soundcard or the Turntable USB/FireWire device if it is listed. If the Soundcard device is selected the sound input will come from line-in of the soundcard device, we assume here that the turntable has microphone functionality build. In the Input Settings set the Sample Rate to 44100Hz.
In”Mic Input” options section select Line Input. Select Open Mixer and set the check mark close to Line Input.
WARNING: do not plug the turntable output in to the Microphone jack (color red on the soundcard) since this may damage the soundcard.
Step 2.
Go to the Output Menu in the Winamp ShoutCastDirect Source applet and find Output Configuration fill in the info about your server:
Address:
Port:
Password: your-password (This is also the server password in the Web-Control System)
Note: Your Transcoder has to be stopped on the ShoutCastDirect web-based control system, this can be done in the server control page.
When the connection is established you should see the numbers in the Output menu, under Status start changing, this means you are connected. Then, go to the Input menu and select your input device.
There are several proprietary applications that can be used to broadcast ShoutCastDirect content. One very popular that many people are use with ShoutCastDirect is SAM Broadcaster.
You can download the demo at spacial audio solutions – 
Please inspect closely our web-based ShoutCastDirect Control system so that you may learn how to see who is connected and how to kick/ban users.

